

Setup a Live Studio from Anywhere!
At TwitchCon San Diego 2019, the LiveU team set up a live streaming studio production on our booth; streaming for 8 hours a day, for 3 days straight. The compact studio setup fits in a small suitcase, allowing us to take it on the road and set up a mobile live studio production from anywhere. How did we do it?
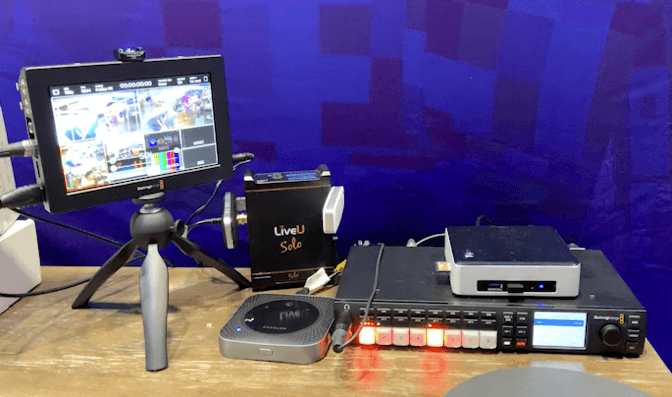
The Gear
- Blackmagic ATEM TV Studio HD
- 3 HDMI Cameras
- LiveU Solo with Modems/Hotspot
- Blackmagic Video Assist Monitor
- Intel Nuc Computer
The Setup
The Blackmagic ATEM TV Studio HD allowed us to connect 4 HDMI sources, as well as an option to add an additional 4 SDI inputs. We added 3 cameras via HDMI, as well as an HDMI from a Nintendo Switch for our live gaming spot on the booth. This source could easily be replaced by another camera, computer, or video source, depending on your production’s needs.
The ATEM Switcher was attached to a Blackmagic Video Assist Monitor via SDI to use the Multiview feature. The Intel NUC computer, which can control ATEM’s Software Control was also connected to the same Video Assist Monitor via HDMI. This lets us keep the setup small. Instead of having 2 large monitors (1 for the Switcher and 1 for the computer) we were able to switch between inputs on the Blackmagic Video Assist Monitor, allowing for quick access of both sources and a small footprint.
All that was left to do was to connect our LiveU Solo to the Switcher’s Program Out via SDI. The Solo SDI live streaming encoder was equipped with a T-mobile modem, an AT&T modem, and an AT&T Netgear Wifi Hotspot. These 3 connections gave us a strong connection inside the San Diego Convention Center throughout the 3 days of the show. We consistently streamed at 6Mbps every day, without dropping a frame.
This is a great setup for multiple applications. Whether you want to stream a live video podcast or stream a table-top gaming setup, this compact and portable solution allows for an easy, high-quality setup, no matter where you go.
A Deeper Dive
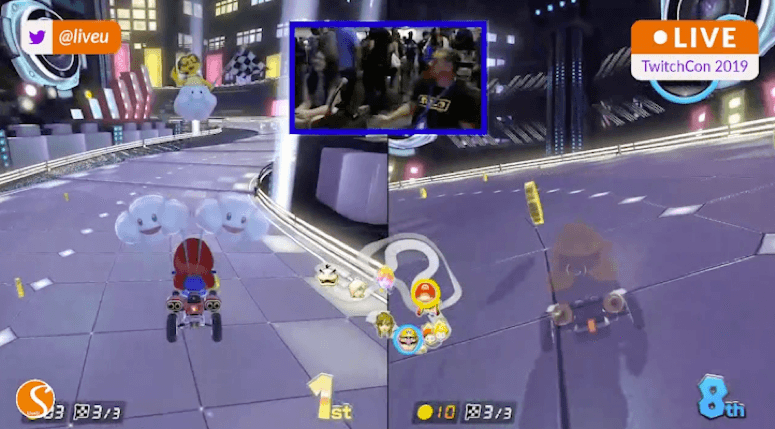
The ATEM Blackmagic TV Studio HD has many features that can take your production to the next level. For example, at TwitchCon we were able to do a PiP (Picture-in-Picture) for when people were playing the Nintendo Switch. By using an Upstream DVE Key we were able to overlay a camera on the actual gameplay. And the best part? You can set it up using only the front panel menu of the switcher, without diving into the Software control.
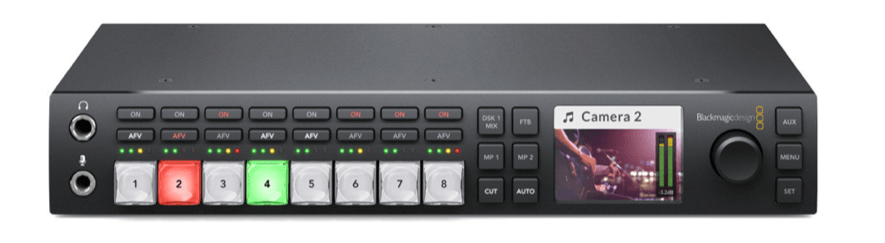
The switcher had some other great features for us, as well, including the quick audio mixing functionality. The front panel of the switcher has buttons called AFV (Audio Follow Video) and ON above each video source button. These buttons allow you to quickly select what you want to hear and on what source you want to hear it. For example, we had our main microphone on our Camera 2 source, but we kept it on for the majority of the show. By selecting the ON button, that microphone stayed hot no matter what source we’d switch it to. On the other end, using the AFV button we could switch cameras and have ONLY the audio of the active source live.
Our stream destination was a generic RTMP source, which allowed us to control our scene setup in OBS on a virtual server, and switch scenes remotely on our phones. Using applications like Lightstream or Psynaps, you can manage and control your scenes without being at your computer. This solution is what allowed us to stream from our mobile production studio setup, go to a “Be Right Back” screen on stream, unplug our LiveU Solo, throw it in a backpack, and come back completely remote, without having to stop the stream. However, with this setup, you could stream directly to a destination if you don’t need to worry about switching scenes.